The Uber Destination Filter is a powerful tool that helps drivers to maximize their revenue.
Uber allows drivers to use the Destination Filter twice daily. Therefore, you will want to save them for when you need them.
In this article, I will share with you what the Uber Destination Filter is, how, and when to use it.
What Does The Uber Destination Filter Do?
The Uber Destination Filter allows drivers to set a destination, and the Uber app will only send you rides headed in that direction.
It doesn’t match you with trips headed only from Point A to Point B; instead, it matches you with trips headed in the same general direction from Point A to Point B.
To reconfirm, you can use the Destination Filter only twice a day. If you set a destination but don’t get any rides, you can stop the filter or change the destination without using up one of your two destinations for the day.
When you get a ride while on the Destination Filter, one of your two daily uses has now been used.
You can continue to get rides headed toward that first destination, though (so you could potentially get unlimited rides headed to that first destination).
Therefore, once you set the Destination Filter, you can get multiple rides heading in the same direction. That instance will not end until you go offline or end the Destination Filter.
For example, when I am fairly close to home, which I have set as the destination, I will go offline and go home, ending that one use of the Destination Filter.
How the Uber Destination Filter Works
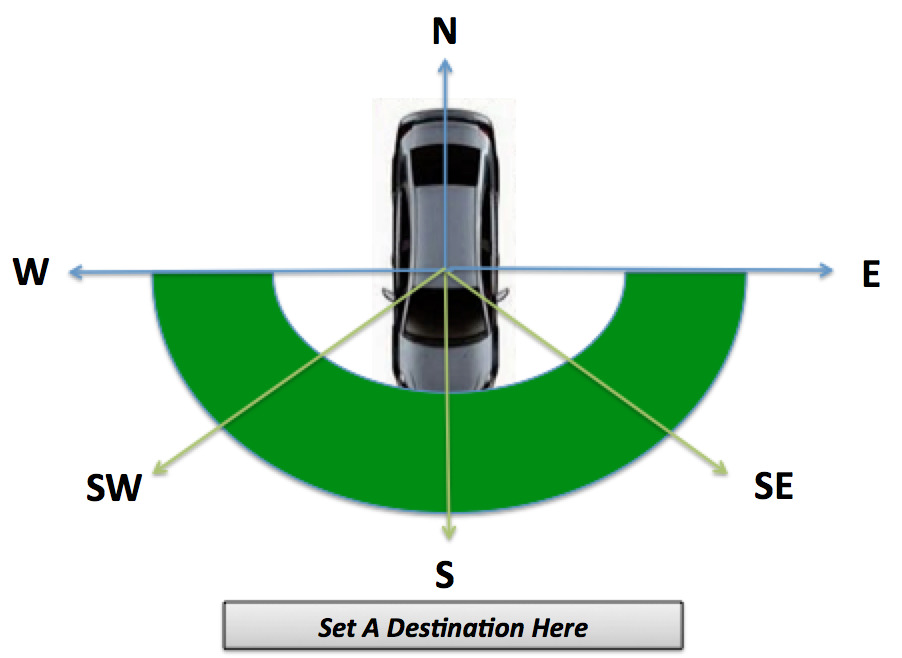
In most cases, the destination filter won’t get you long rides to your final destination, but it will give you a series of short rides headed in the general direction of your destination.
So if you’re heading north to south, for example, you won’t get rides headed north at all, but you could get rides from W to SW to S to SE to E.
Even though you probably are only hoping for rides directly south or off by a few degrees
This image shows you the range of directions the Destination:
How To Use The Destination Filter
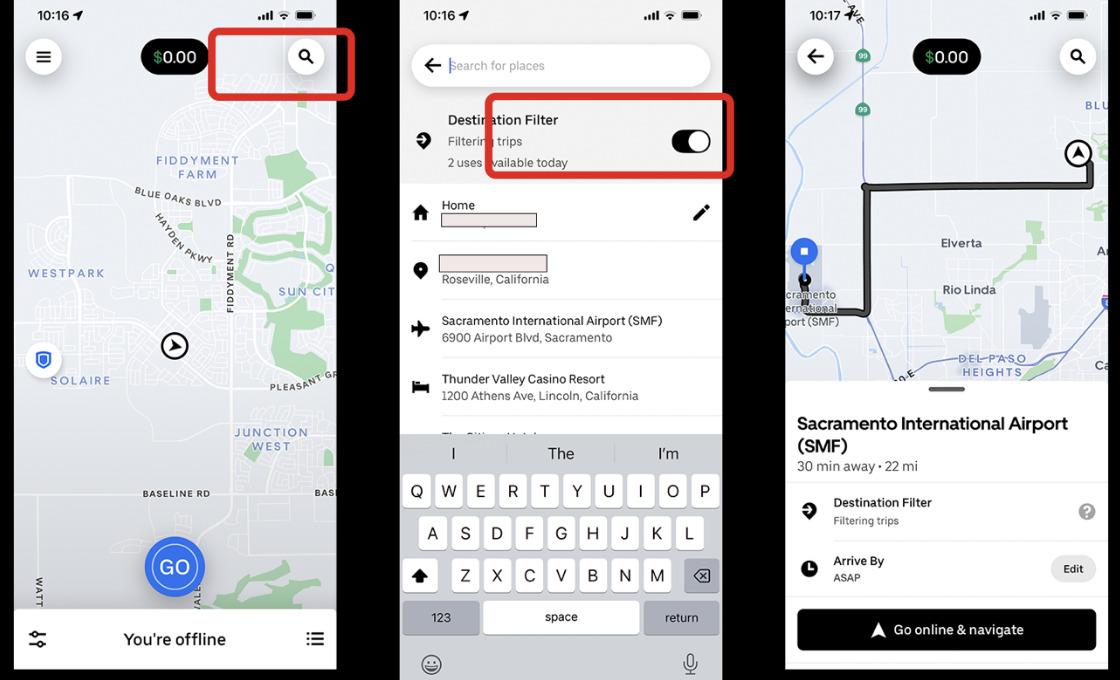
From the home page of the Uber Driver app, you can see the magnifying glass in the upper right corner, tap it, and you will go to the Destination Filter page.
There are two steps to set it up.
- First, you must hit the toggle to on as indicated by the red rectangle in the middle screenshot.
- Then, you can type in a destination or pick one you previously used.
My most frequent destination is my home. You will also notice Uber lets you know how many uses you have available.
In the middle screenshot below, you can see I have two remaining uses. In the final screenshot, you can see the map showing your current location and your destination.
Tap Go, and you are in Destination Filter mode!
When Is The Best Time to Use the Uber Destination Filter?
The best time to use the destination filter is at the beginning or end of your shift.
Many Uber drivers live in the suburbs, and since it’s more profitable to drive in the city near downtown, drivers often head one hour or more into the city to drive.
If you live in a suburb, consider turning on the destination filter in the morning on your way into the city. That way, you can capitalize on all of the other commuters going to work or the airport.
Remember, the destination filter works best when many requests are coming in and you’re going with the traffic flow.
When you’re near the end of your shift, the Destination Filter can come in handy as it will get you rides headed home.
Example of Destination Filter In Use
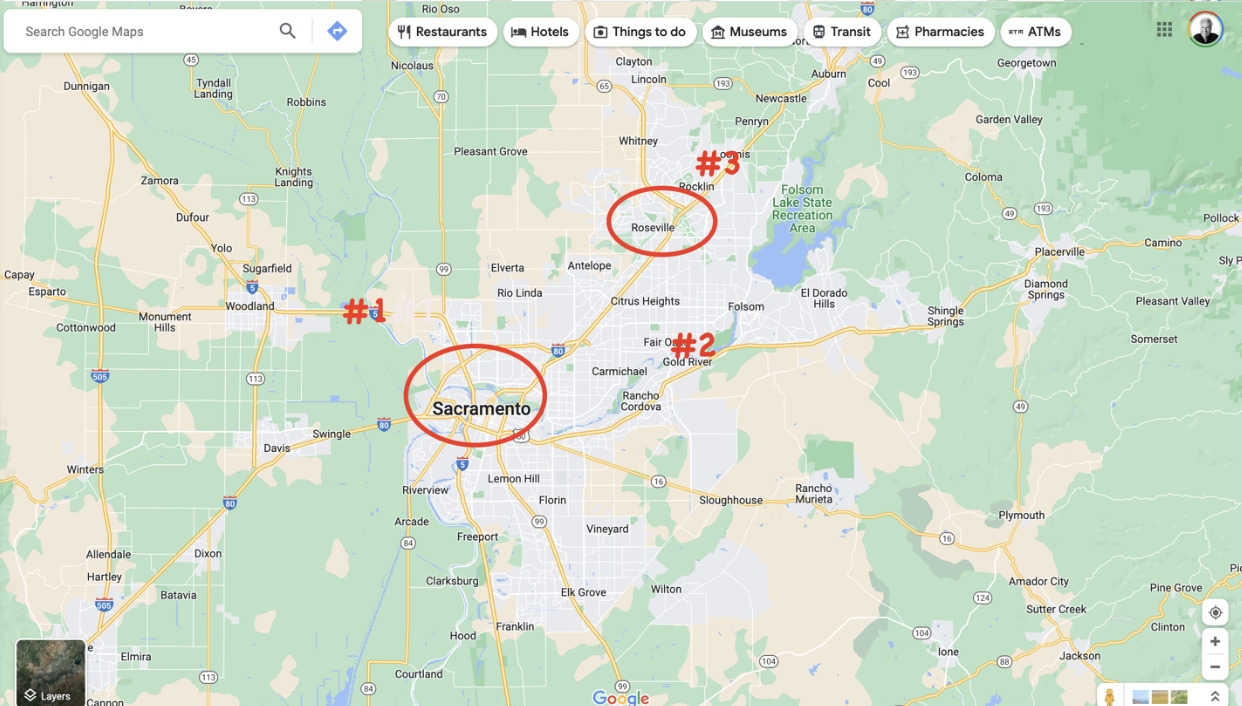
This past weekend, I was in downtown Sacramento. I was ready to end my shift, so I set the Destination Filter to my home.
I had achieved all my bonuses for the weekend, therefore, I had no expectations for results, sometimes, I may get five rides, and other times, I may get one ride.
In all cases, I set the Destination Filter and drive directly toward my home. Once I get a ride, I pick up and then drop off my passenger and then resume driving toward my home.
In this instance, I received three rides. Each one moved me closer to Roseville. My last ride put me within 15 minutes of my destination, so I turned off the app and drove home.
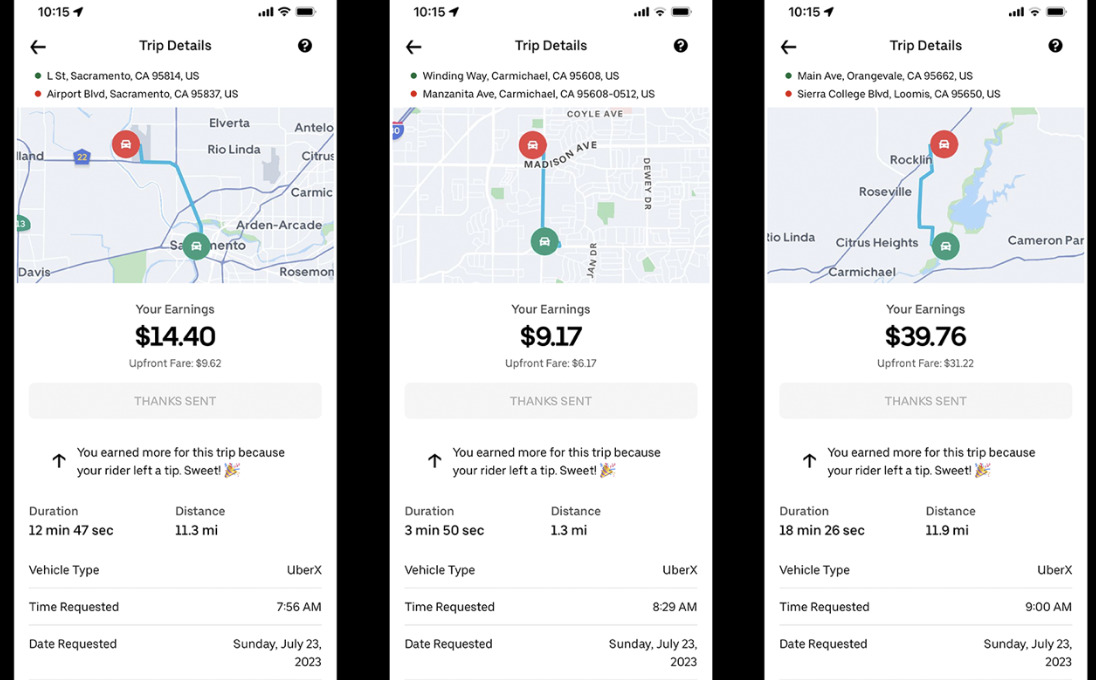
As you can see, the Destination Filter allowed me to make an extra $60 and get me very close to home.
- The first ride took me to the airport.
- The second ride took me closer, but only a little.
- The third ride got me fairly close and provided a long, profitable ride.
This is why the Destination Filter is so useful. It provides an additional source of revenue that previously did not exist.
Benefits of the Uber Destination Filter
The primary benefit is cutting down on driving time without a passenger. As my example showed, I could complete three trips and pocket an additional $60 instead of driving home and not earning any revenue.
You can also use the Destination Filter if you are far from your area. You can use the Destination Filter only to give you rides back to your main driving location.
Another benefit is all the rides using the destination filter will count toward your bonuses.
Drawbacks of the Uber Destination Filter
There is just one drawback, and it is a small one. Destination Filter rides aren’t allowed at airports.
But once you get just a mile or two away from the airport, the Destination Fitler will begin to work for you again.
Key Takeaways
When I first started driving in 2016, there was no Destination Filter. Ending the shift was often simply driving for 30 minutes without a passenger.
We did not even know the destination when we accepted a ride, so even if you accepted a ride, you did not know if it was going in your direction.
Therefore, the invention of the Destination Filter put money in everyone’s pocket and continues to do so. Use it. I always save one for the end of my shift so I can get home.
It doesn’t always work by providing a ride. However, that is not the fault of the Destination Filter but rather of low demand.
Needless to say, it is marvelous when it does work, as it did this past Sunday.
Take care and be safe out there.