Experienced Uber and Lyft drivers know it’s most profitable to drive in blocks of at least a few hours or more since it takes some time to get into a groove, and you can minimize dead miles that way. But what if you only wanted to drive for Uber on your way to and from work or while running errands around town?
Uber’s had a destination filter for a while now that lets you set a specific destination and only get rides headed in that direction – but it might double or even triple your commute time. So when Uber announced they’d be adding a new feature called Arrival Times (a time component to the destination filter), I was excited to try it out. I came up with a new driving strategy based on this new feature, where we can set a destination and an arrival time.
I work from home so I don’t have an office that I commute to every day, but I do travel all around Los Angeles. For the past few months, I’ve been turning on my destination filter nearly every time I leave the house to see how much I could earn.
During the course of my experiment, I made 26 commutes, matched with at least one rider 17 times and earned $116.99 after expenses. The total earnings from this experiment weren’t huge, but I did earn over $30 per hour if you averaged out all of my trips.
Let’s dive into the numbers and see how it looks:
Overall Earnings From Uber Driving While Commuting
I ran this experiment over three months (here’s my data) although I did most of the rides during the last month of the study. Since I work from home, I rarely leave the house during rush hour, so most of my driving occurred during off-peak hours. Passenger demand is usually lower during these times, but I still matched on nearly 2/3 of my commutes.
I definitely noticed higher match percentages during the busier times, but you’ll also have more traffic to deal with.
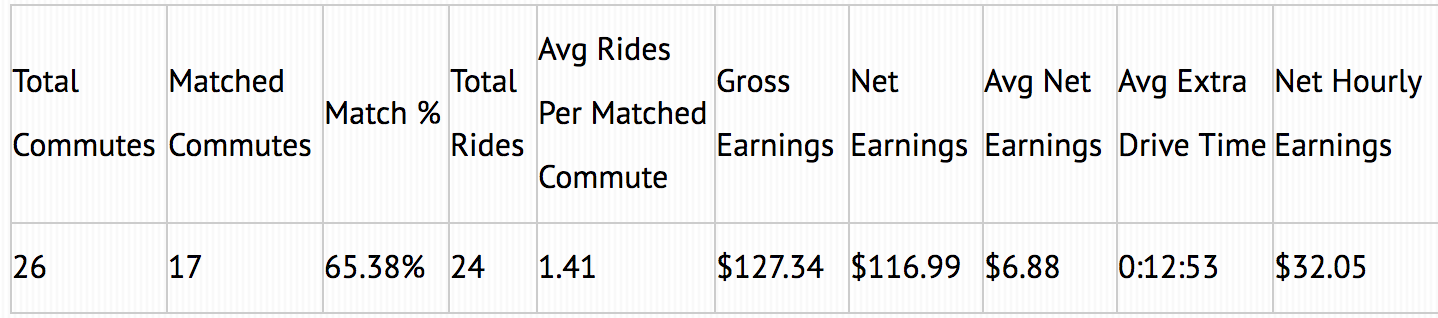
My average commute was 30 minutes during this study and on the rides where I matched with a rider, I only went an average of 13 minutes out of my way. My average earnings per matched commute came to $7.20.
The biggest surprise to me was how few extra miles I put on my car. I did a total of 24 Uber trips, but it only added a total of 50 extra miles since all of the trips I was getting were in the same direction I was heading anyways. It doesn’t always feel that way when you’re zig-zagging around town to pick up and drop off riders, but I was surprised at how few additional miles and little time it added to my commutes.
Related: The Best Apps to Track Your Mileage
I was worried that all the extra miles I put on my car from doing this would cut into my gross earnings of $127, but if we use the 21 cents per mile cost of operation for my car from our CPM article, my net earnings were still $117.
It was pretty rare that I got the perfect match though: a ride originating near my departure point and ending near my destination. As we’ve detailed in the past, the destination filter is really more focused on getting rides in the direction of your final destination as opposed to getting you all the way there in one shot.
The overall net earnings of $117 may not be impressive to everyone, but if you calculate my net earnings on an hourly basis, I actually averaged over $30 per hour during this experiment. While this definitely isn’t going to make you rich, it could easily cover your gas money and some monthly car expenses.
How Would Daily Commuters Fare?
If we assume that you go into work Monday-Friday, that’s 40 total commutes (4 weeks x 5 days x 2 commutes) over the course of a month. If you match on 2/3 of those rides, that means you’ll have 27 matched commutes or potential net earnings of $178 per month (27*$6.59).
That should easily cover your gas money and then some, but it probably won’t cover all of your expenses. I think this strategy works out best for someone who has a 30-60 minute commute and is flexible on when they need to be in.
The earliest arrival time you can set is usually 50%-100% of the total time of the trip. So if you have a 60 minute commute and you leave at 7 am, you will be able to set an arrival time of 8:30-9 a.m. depending on the traffic conditions.
If you don’t get any matches, you’ll obviously arrive at 8 a.m., but if you get a few short matches, it will be closer to 9 a.m. I actually rarely got more than one match when I did match, but your results may vary depending on when you drive. If you commute during rush your, you’ll probably get more trips, but I don’t think the short trips would be as worth it if I had to sit in traffic to do them.
I was surprised by the results of this study and I think if more people were aware of this strategy, they might drive for Uber on their commutes to/from work or around town. Your overall earnings numbers won’t be huge, but surprisingly, you don’t put many miles on your car and you don’t go too far out of your way.
Combine with Quest Bonus
Most of my rides were off peak so I didn’t get many surge rides, but if you combine this strategy with Earnings Boost or Quest, your numbers will look even better. Most Quest bonuses I’ve seen require at least 10-20 trips to get a bonus, so you’ll probably have to do some additional rides one day.
 Related article: Essential gear every rideshare driver should have
Tips & Best Practices
During the course of this study, I experimented a lot with different strategies and tactics so my earnings are on the conservative side. Fortunately for you, you can take what I learned and apply it to make even more:
- Go online before you need to leave: I would often go online about 5-10 minutes before I wanted to leave and do little things around the house (unload the dishwasher, make the bed, etc) and some of the time I would get a ride request. This is obviously the best case scenario, since you’re getting a request sooner, but you have to keep an eye on the app so you don’t miss the request. I recommend using Mystro to auto-accept trips so that you don’t miss the request (you can use it with one app).
- One POOL rider is good but two can be good/bad: UberPOOL riders are great when using this strategy since you can’t be too picky, but on longer commutes there’s no point in adding second riders since the extra hassle isn’t worth the money. I recommend turning off new ride requests (go to the menu of the driver app) as soon as you accept a first POOL rider. On shorter commutes though, two POOL riders are a good thing since that means you’ll get two minimum fares.
- Do errands along your commute: If you want to increase your chances of getting a match, you can always stop and run quick errands (like getting gas, dropping off a package, etc.) while remaining online. I stopped for gas once with the app on and ended up matching with a rider across the street whose destination was just one block from me. It was only a 3/4 mile ride for a minimum fare, but I literally went 30 seconds out of my way and made a quick few bucks (plus a tip!)
- Avoid backtracking (especially on the freeway): Uber’s destination filter has gotten a lot better over time, but I did get a couple requests where I had to backtrack to get the passengers. I think it’s still worth it if you’re on side streets AND there’s no traffic, but I wouldn’t backtrack more than 2-3 mins to get a passenger if there’s traffic and/or you’re on the freeway.
What About Lyft’s Destination Mode?
Lyft also has destination mode but it doesn’t match nearly as often as Uber’s Destination Filter since Lyft’s ride density is so much lower (way fewer requests, so less likely that someone is headed in your direction). On longer trips, it could be worth it to do both apps, but there’s no guarantee you’ll get that long trip you want.
Methodology
I tracked all my rides in this spreadsheet, but it was a lot of work to do so. If you’re up for the challenge, here’s what you’ll need to do.
- Go online with your driver app before you want to leave your starting point or as you’re leaving.
- As you’re leaving your starting point, navigate to your final destination and take a screenshot so you can see an estimate of the time/distance.
- Once you get into your car, reset your odometer.
- Drive towards your destination and take any Uber rides that come along the way.
- Once you arrive at your final destination, take a picture of your odometer so you have a record of the total miles driven and the time.
Once you have all this information, all you have to do is enter it into the ‘Calculations’ tab of my spreadsheet. You’ll also need your payout information from partners.uber.com or the ‘Earnings’ tab of the Uber driver app.
My spreadsheet will calculate the additional time it took and the additional mileage you drove. If you know the cost per mile of your vehicle you may enter it or use our recommended range of 20-40 cents per mile (more economic the car, the lower the cost per mile).
Want to see how I calculated this all in action? Check out the video below and subscribe to the RSG YouTube channel here!
What About Uber Commute?
Uber has their own program called Uber Commute, but it’s only available right now in Northern Virginia and DC. The one downside to my strategy is that you rarely get the perfect match: a ride request originating near your starting location and ending near your final destination. From the looks of it, Uber’s Commute program is more geared towards finding ‘perfect trips’ for you.
A lot of people commute to work using Uber in bigger cities but it doesn’t seem like there are a ton of riders commuting to/from work every day from the suburbs yet. This is definitely an area to keep an eye on!
Related article: Essential gear every rideshare driver should have
Readers, have you tried rideshare driving while on your own commute? How does it go for you and would you say it’s worth it? Are you going to try this strategy out?
-Harry @ RSG