If you’re a Lyft driver who doesn’t use their destination filter, you could be missing out. Maybe you’ve never heard of it or don’t know exactly how to use it to your benefit.
Whatever the reason, don’t worry. This in-depth guide to Lyft destination mode will help you understand this powerful tool along with the strategies you can use to maximize your revenue.
Destination filters are a feature in both Lyft and Uber that allow you to only get rides headed in a specific direction. Many people use them to get from the suburbs, where they live, to the city, where there are more rides.
Lyft’s destination filter, which is called Destination Mode, has been around for the past few years although it underwent some changes recently.
Looking for more information about Uber’s destination filter? Check out Uber’s destination filter here.
How Lyft’s Destination Mode Works
Destination Mode helps you control the rides you receive by limiting them to a specific area that you are heading to. You can even use this feature to reach your destination by a certain time and pick up rides along the way.
For example, if you’re planning on returning home from your Lyft driving by 10 pm, you can set destination mode to allow you to receive trips that are on the way to your home leading up to the time you set. Keep in mind that when you first enter Destination Mode, you may be matched with rides going in any direction but as your arrival time gets closer, you’ll get trip requests that are near your desired destination.
To start using Lyft Destination Mode, just follow these 5 steps.
- Open the Lyft Driver app, go online, and tap the filter icon in the top right corner
- Choose between filtering rides by ‘Arrive on time’ or ‘Head to destination’
- Enter your destination (home, work, an appointment, your kid’s school, etc.)
- If you selected ‘Arrive on time,’ enter the time you need to be at your destination
- To edit your arrival time or destination, tap the pencil icon. That’s it!
To exit Destination Mode, tap ‘edit’ next to the destination address, then ‘remove filter’, and you’ll go back to receiving regular ride requests as normal. Once you reach your destination, you’ll be automatically logged out of Destination Mode.
Two Modes to Choose From
You will notice there are now two modes. In the app, Lyft defaults to the “Arrive on time” option. Let’s take a look at the destination mode home screen where you will make your choice:
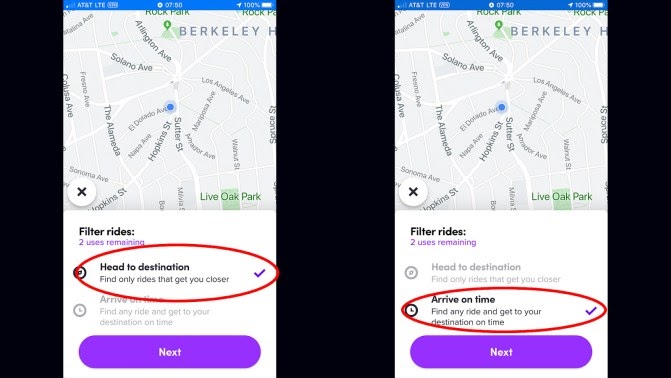
The first screenshot shows you the traditional destination filter. This option will only give you rides that get you closer (by time) to your destination.
The second screenshot shows you the new “Arrive on time” option which gives you rides, always allowing you enough time to drive to your destination by your set deadline. Now let’s jump into the strategies.
Video Examples of How Lyft’s Destination Mode Works
The below videos will show you step by step how to use and interact with Lyft’s destination mode:
Benefits and Drawbacks of Lyft Destination Mode
As with all rideshare app features, there are benefits and drawbacks to consider. It’s great to weigh the pros and cons and while some drawbacks may not be avoidable, it’s helpful to know what they are you can be mindful when planning out your driving days.
Benefits:
- Get matched with rides that are heading toward your desired destination: Of course, this is the most powerful reason to use a destination filter in the first place. In the past, drivers just had to turn off the app or accept trips that were further away from where they wanted to go during certain parts of the day. Now, you can be more strategic with this flexible feature.
- New time element feature: The ‘Arrive on time’ feature ensures that you’ll get to your desired location by a certain time while completely trips along the way.
Drawbacks:
- Daily uses are more limited: Lyft drivers used to be able to use Destination Mode up to 6 times per day, which would equal a total of 8 times daily if you drive for Uber as well and used their destination filter. Lyft recently reduced the amount to two, which means you can only use a destination filter a total of four times per day with both Uber and Lyft combined.
- Greater possibility of fewer trips: Lyft claims destination mode will help drivers become 20% more likely to get a ride. These odds are still low, especially when compared to Uber’s destination filter option. We all know that the more time you spend waiting on ride requests, the less money you make.
Best Strategies to Consider When Using Driver Destination
Use The “Arrive On Time” Option To End Your Shift
In the good old days, the destination filter was a simple tool. When you needed to go home at the end of your shift, you would set your destination filter to home and then drive toward home.
If Uber or Lyft found a ride that would move you closer to your destination, you would get a ping, pick up your passenger, drop off your passenger, and then continue toward home.
Now, Lyft has augmented this process by adding a time element, guaranteeing you that you will arrive home by your specified time.
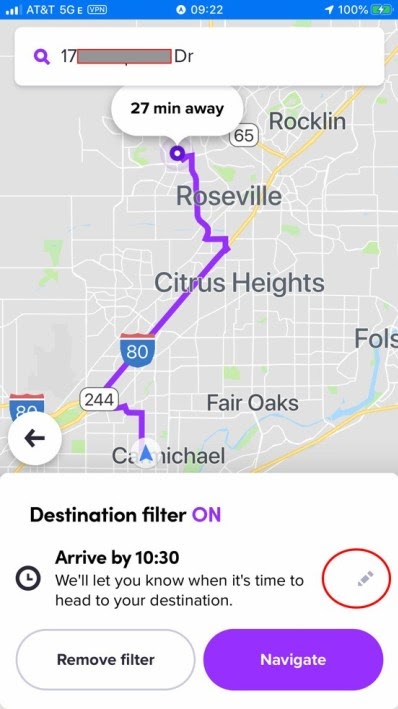
Once you set your destination mode, your home screen will show you your settings. In this case, the time was 9:22 AM when I set the filter and I was ready to head home.
The destination filter defaulted to an arrival time of 10:30 AM. We can see that the ride to home is 27 minutes in duration. Therefore, Lyft has an extra half an hour or so to find me some rides and allow me to arrive at home by 10:30.
If you want to change the arrival time, you can click on the pencil icon (in red ellipse above) and you will be taken to this screen:
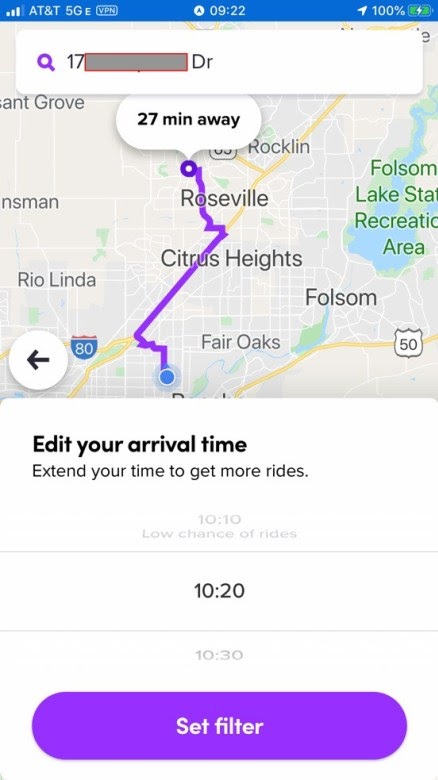
Here, you can change the arrival time by swiping up or down.
Let’s say, for example, you really want to get one more ride in before you end your shift. Well, then you can delay your arrival time and give yourself a better chance of getting a ride.
In this example, you could change the time to 11:50 AM, adding over an hour, to ensure a better chance of getting a ride.
One thing that is very different about this destination filter is you will not always get rides that move you closer (in time or distance) to your destination. The lesson here is that as long as a ride leaves you with enough time to get to your final destination by your selected arrival time, you will get that ride.
Use Your “Head To Destination” Option To Secure Long Rides
This is the old strategy to earn long rides, rack up the freeway miles, and increase your per hour earnings. This strategy can allow you to craft long rides heading toward a major city.
The real negative about Lyft’s recent changes is the shift from 6 uses to 2 uses.
Consequently, if you use one use for the end of your shift, you will only have one remaining use to procure long rides. Here again is another reason to have Uber in your back pocket as you will have an additional two Destination Mode uses with Uber, for a total of four.
Choose And Use Your Destination Mode Uses Wisely
Since you only get two uses, do not waste them. Allow enough time for the app to find you a ride to your destination.
If you are going to set arrival time, set ample time to get a ride in addition to the drive time. If you only want to drive for another 15 to 30 minutes, it may not make much sense to use Destination Mode and get the full benefits.
Summary
Destination Mode is definitely something you should consider adding to your strategy as a Lyft driver.
While you shouldn’t rely on it solely, try to integrate some of these strategies to make your driving day more manageable. If anything, you should be able to use it when you’re heading back home and want to end your shift.
You can also use it to get longer trips like rides to the airport, especially during low traffic times.
What are some of your favorite ways to use Destination Mode?
-Chonce @ RSG